
Setting up a VNC repeater on Linux

Key points
- A VNC repeater lets a viewer and a server behind firewalls or NAT meet through a third machine, the way TeamViewer works.
- How to set up UltraVNC’s repeater on a Debian node, with its two modes explained.
- The MSRC4 plugin in my script encrypts with RC4, which is broken, so do not rely on it for privacy.
Setting Up Your Repeater for VNC Sessions
Updated October 2026: Running your own VNC repeater still works, with a few changes since 2014:
- UltraVNC is now at version 1.8.3.0 and its downloads moved: the viewer and server are on the UltraVNC downloads page, and the repeater has its own page. The Linux repeater source in my script still downloads.
- The MSRC4 plugin in my script encrypts with RC4, which is broken and has been banned from TLS since 2015 (RFC 7465). Use UltraVNC’s SecureVNC plugin instead, or carry the VNC traffic inside an SSH tunnel or a VPN.
- Keep
allowedmodes = 2as I did: mode 1 makes the repeater connect to whatever address a viewer asks for. Open only the repeater ports you use in your firewall.
You may be familiar with how TeamViewer works; it can operate behind almost any firewall or NAT. The secret is that both the client and server do not contact each other directly but through a repeater owned by the company, allowing the client and server to initiate a reverse connection to the repeater. If you are concerned about having a third party involved in your VNC sessions, I will explain in this post how to set up your own repeater on Linux. For Windows, the process is straightforward.
The software used to achieve this is UltraVNC, which is free and open-source. The project provides a client (viewer), a server, and a repeater.
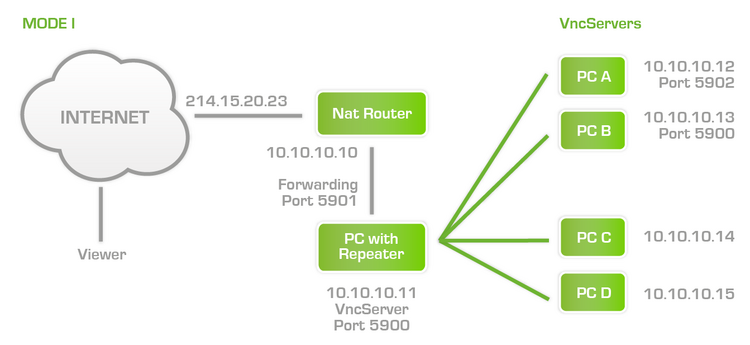
How a VNC repeater connects viewer and server
A VNC repeater works in one of two modes. In mode I, the viewer connects to the repeater and names the server it wants by address and port, and the repeater opens that connection for it, so the server must be reachable from the repeater. In mode II, the server and the viewer both connect out to the repeater with the same ID number, and the repeater joins the two; neither side needs an open port, which is why my script below allows mode II only.
Repeater setup on the Debian node
# Make sure you have a static IP on your node

# Update your node:

apt-get update
apt-get upgrade

# Get some packages:

apt-get install nano xorg libxtst6 psmisc build-essential
apt-get install libx11-6 libx11-dev

# Download the repeater source into /usr/local/src

cd /usr/local/src
wget http://www.wisdomsoftware.gr/download/uvncrep017-ws.tar.gz

# Extract the source file

gunzip uvncrep017-ws.tar.gz
tar -xvf uvncrep017-ws.tar

# Install

cd uvncrep017-ws
make; make install;

# Add a user for the service you can change this on config file

useradd uvncrep

# Edit configuration to suit your needs for me I only changed ports + allowedmodes = 2

nano /etc/uvnc/uvncrepeater.ini

# Start the service

/etc/init.d/uvncrepeater start
# or
service uvncrepeater start

# Stop the service

/etc/init.d/uvncrepeater stop

# To monitor the logs:

tail -f /var/log/uvncrepeater.log

# To test your server:

winvnc.exe -id:424 -repeater IP_Number::Repeater_Port -run

# To encrypt the traffic change the following settings on ultravnc.ini and make sure you generate your key rc4.key

UseDSMPlugin=1
DSMPlugin=MSRC4Plugin_for_sc.dsm

# To run it as service change the following settings on ultravnc.ini

service_commandline=-autoreconnect -id:Your_custom-ID_Number -connect IP_Number::Repeater_Port