
iOS Tips: Keyboard Shortcuts on iPhone & iPad
Key points
- Text Replacement turns a short code you type into a long word, address or sentence: Settings, General, Keyboard, Text Replacement, then +.
- Your replacements sync to your other iPhone, iPad and Mac through iCloud.
- Since iOS 18 the settings of Apple’s own apps (Safari, Messages, Calendar) sit under Settings, Apps; the paths below are corrected for current iOS.
Save Time with iPhone Keyboard Shortcuts
Updated October 2026: I wrote these tips for iOS 8 and iOS 9, and Apple has renamed or moved many of the settings since then, so I have corrected the paths below for current iOS (iOS 18 and later); Apple’s iPhone User Guide has the current steps for every setting. Apple now calls iPhone keyboard shortcuts Text Replacement: go to Settings → General → Keyboard → Text Replacement, tap + at the top right, type the Phrase and the Shortcut, and tap Save. Your text replacements still sync to your other iPhone, iPad and Mac through iCloud.
Two other changes catch most people out: since iOS 18 the settings of Apple’s own apps (Safari, Messages, Calendar) are under Settings → Apps, and since iOS 13 Accessibility is a top-level entry in Settings instead of being under General. The screenshots are from iOS 8, and the tips that only applied to iOS 8 are marked as such.
Are you tired of typing out long words, names, web addresses, email addresses, or entire sentences over and over again? You can save yourself time and effort by setting up iOS keyboard shortcuts for any text that you type regularly. By default, the iPhone and iPad come with “omw” as a shortcut for “On my way!”, but you can create and customize any shortcut you want. What’s more, thanks to iCloud, any shortcut you create will automatically sync between your iPhone, iPad, and Mac. Once you start using keyboard shortcuts, you’ll love them. Here’s how to do it!
Index
How to set up keyboard shortcuts on iOS, Step 1: Go to Settings

Step 2: Select General

Step 3: Keyboard

Step 4: Text Replacement (called Shortcuts in iOS 8)

Step 5: Add New Shortcut (now the + button at the top right)

Step 6: Enter the phrase and the shortcut that will produce it, then tap Save
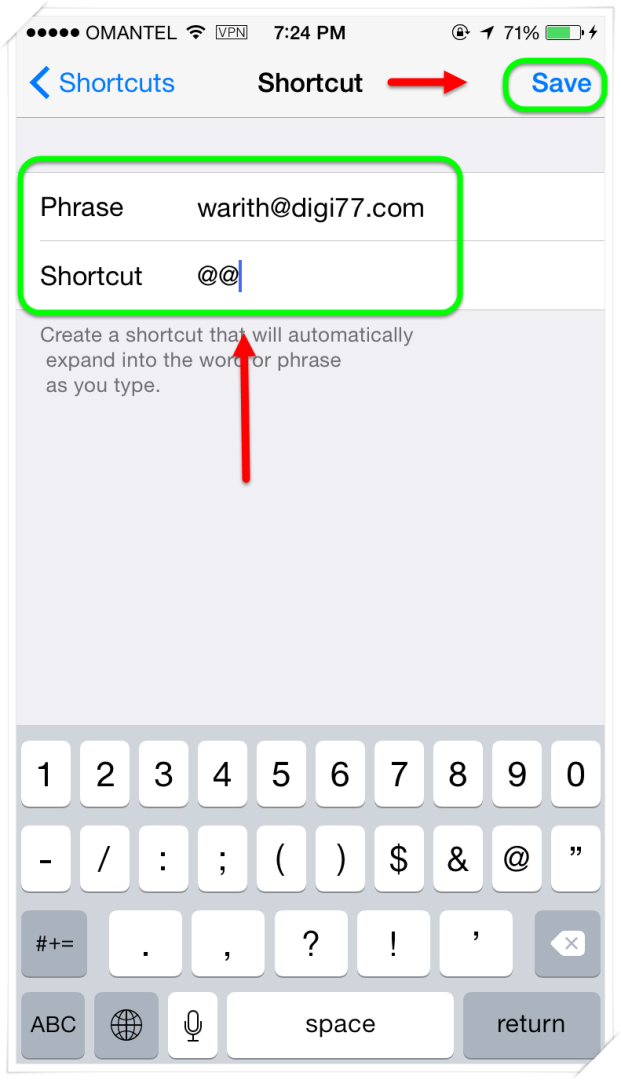
Example


To use a shortcut, just type the text you set up and hit the space key. The shortcut will be replaced by the phrase, and you’ll be on your way!
You can edit shortcuts by tapping on them. To delete them, tap “Edit” at the bottom left of the Text Replacement screen, or swipe from right to left on the shortcut and tap “Delete.”
Videos
More from my channel:
More Tips
- While typing, double-tap the space bar to add a period at the end of your sentence.
- To switch between the number and letter keyboards faster, hold down the 123 key and then slide your finger to the digit you’d like to select.
- To add emoji or other languages to your keyboard, go to Settings → General → Keyboard → Keyboards → Add New Keyboard and select Emoji or any other language you use frequently.
- To add web suffixes such as .com when you’re entering the last part of a web address in Safari, hold down the period key instead of tapping it.

- Toggle Caps Lock by double-tapping the arrow Shift key on the keyboard.
- On iPad, you can split your keyboard in half for easier typing by placing two fingers at the center of the keyboard and pulling them away from each other.
- To find battery-hogging apps, go to Settings → Battery (in iOS 8 it was Settings → General → Usage → Battery Usage).

- Save battery by disabling Background App Refresh for certain apps: go to Settings → General → Background App Refresh.
- Make Siri easier to talk to: go to the Siri settings (Settings → Siri, called Apple Intelligence & Siri on newer models) and turn on listening for “Siri” or “Hey Siri”. The microphone will then listen for you to say it and bring Siri to life to assist with your audio query. When I wrote this tip, it only worked while the phone was plugged into power; every iPhone since the iPhone 6s (2015) listens without a charger.

Calls, data and private search
Block annoying calls: you can choose not to receive calls from a specific number or contact by tapping the ‘i’ button next to that entry in the Recents or Voicemail sections of the Phone app, scrolling down, and choosing Block this Caller.

Monitor the cellular data your apps use: go to Settings → Cellular (Mobile Data or Mobile Service in some regions) and scroll down to see each app’s usage and turn off cellular data for any app.

For private web searches, go to Settings → Apps → Safari → Search Engine → DuckDuckGo (Settings → Safari before iOS 18).

- To mute a specific conversation, swipe left on it in Messages and tap the bell, or open it, tap the name at the top and turn on Hide Alerts (it was called Do Not Disturb in iOS 8).
- iOS 8 only: when you double-click the Home button to enter the App Switcher, you’ll notice a row of contact circles above your open apps. To disable them, go to Settings → Mail, Contacts, Calendars, scroll to Contacts and turn off Show in App Switcher. iOS 9 removed this row.

Receiving audio messages doesn’t mean we want anyone within earshot to hear them. Thankfully, Apple added a “Raise to Listen” feature that lets you hear and reply just as if you were on a phone call: go to Settings → Apps → Messages and turn on Raise to Listen.

You can set messages to expire after 30 days or a year (Keep Messages), and audio messages to expire 2 minutes after you listen to them. Do it in Settings → Apps → Messages.
Find My, Calendar, Reminders and AssistiveTouch
If you lose your phone (or someone steals it), Find My iPhone will automatically beam the last location to Apple before the battery drains, giving us one more tool to help find it. Turn it on (or off) in Settings → [your name] → Find My → Find My iPhone, and turn on Send Last Location there too.

iOS supports Chinese, Hebrew, Islamic and other calendars in the Calendar app: go to Settings → Apps → Calendar → Alternate Calendars.

Create shared lists in Reminders, so multiple people can add items to the list: open the Reminders app, open a list, tap the More button (the three dots) and choose Share List.

The Home button on your iPhone gets less responsive over time and users usually do the next best thing, press harder! One way to salvage the Home button is to use the AssistiveTouch button: go to Settings → Accessibility → Touch → AssistiveTouch and turn it on.

Going into Settings on iOS is like looking for your keys in the dark. While spelunking. It can be maddening, especially if you have a ton of apps but you only want to change one thing, such as how it uses Notifications. Thankfully, in iOS 9, Apple added a speedy little search box. Search on any keyword or app; it provides a series of links to get you to the setting you want.

Battery, Photos and Wi-Fi Assist (iOS 9)
The iPhone’s Achilles’ heel for its entire existence has been the battery. It’s barely good enough for a full day without a recharge. Hence the introduction of Low Power Mode, though you have to turn it on yourself: Go into Settings → Battery, and it’s at the top. When activated, the mode turns off a lot of background functions, like app refresh, automatic downloads, GPS/location services, and many visual effects. It’ll check in with you again at 20 percent and 10 percent power. You can tell when it’s working because the battery life indicator at the top turns yellowish-orange. Low Power Mode will deactivate when you go back above 80 percent, and thereafter, you need to manually turn it on again if needed.

- Before, if you wanted to delete a bunch of photos in the Photos app, you had to tap Select and then tap each one. If there’s a whole page of photos to delete, tap Select and drag your finger left/right and up/down across the rows and columns of images. They’ll all get the blue check mark to indicate selection.
- With Wi-Fi Assist, when an iPhone is in a spot where the Wi-Fi should be strong and clear and wonderful, but isn’t, the iPhone automatically falls back to using the cellular data connection. This feature means you’ll always get a connection.

Safari, Messages and Siri tricks
If you’re surfing the web with Safari and find a mobile website not to your liking, it’s easy to switch to the desktop version: tap the page menu button in the address bar and choose Request Desktop Website (in iOS 9 you held your finger on the refresh icon).

If you have a reason to turn a website (mobile or desktop) into a PDF, you can do it from within Safari on iOS: tap the Share button, tap Options at the top and choose PDF, then choose Save to Files. iBooks, where this tip used to save the PDF, was renamed Books in 2018.

Do you get a lot of spammy messages via iMessage or SMS text? There’s a feature under Settings → Apps → Messages (Settings → Messages before iOS 18) called Filter Unknown Senders. Turn it on, and in the Messages app, you’ll now get buttons at the top for “Contacts & SMS” (that’s for everyone you know who is listed as a contact) and “Unknown Senders.” That way you still get the messages, but they’re not part of the regular list, and messages from unknown senders arrive without an alert sound or vibration.

Originally, if you asked Siri to place a call, she would, but if you needed it on speaker, you still had to hit a button. Not very hands-free friendly. Now simply add “on speaker” to a request (like “Call Lindsay on speaker”) and Siri will send the call directly to the speaker phone.